Wednesday, December 30, 2009

Ski at home

One of the most notable features of our yard is that it is very sloped. After leaving the showing of our future house the thought popped in my head, "Hey, I bet I could ski down that". Nice idea but small problem. We first saw our house in April. Ever since then, I have been waiting for enough snow to strap on my short skis and let gravity take care of the rest. It finally happened recently. Jess thinks I'm nuts, but knows how much I've been waiting to do this, so without questioning much she pulled out the camera to document this moment. Unfortunately, this may be the only skiing I get in this year. And yes... it was worth it.
A few pics before the run...


and the video evidence...
first run
second run
third run

Sunday, December 13, 2009

Day 8: Best in Vermont

Day 8 was supposed to be 4 hours of steam bending. I figured that since I was going to break a few ribs here and there, 4 hours would be all I could take. I started the morning off by marking out ribs every 6 inches. That left me with 18 ribs. Ironically enough, I only had 18 ribs. That meant ANY failure meant another trip to the HD to get more rib stock. But instead....
The backing strip was a piece of gros grain ribbon from a gift box that read "Best of Vermont. It turned out to be quite the omen. I succeeded on all 18 ribs (so I broke one, but its at a tip, where two piece ribs are often used anyway). I'm real good at wordy posts, so no more words, just pictures.


And then I took a lunch break and refilled my steamer. Once back in the workshop I needed to wait 15 minutes for the new rib to heat up. I had nothing to do and had a camera...


And a video of the bending.

Saturday, December 12, 2009

Day 7: First Blood

So day 7 was supposed to be easy and a prelude to steam bending ribs tomorrow. Steam bending ribs is somewhat exciting (relatively speaking). Deck beams are not all that exciting on the other hand. But installing 5 deck beams was today's chore. Considering my Greenland yak has 8 or 9 deck beams, this was supposed to be easy. Instead it took all friggin day long.
One major difference between a canoe and a kayak is the lack of deck beams in a canoe. Usually there is only one deck beam called the thwart. The stems are heavily reinforced with a breast hook or a wedge to help the tips angle apart. Instead of the breast hook, I'm using two closely spaced deck beams to give it shape (along with the thwart). Being that this is my first canoe, I really hope this all works. Only when I take out the forms will I find out if it keeps its shape.
Installing deck beams if fairly strait forward but tedious. Each deck beam has two angles that need to match the gunwales. The first angle is the shape of the gunwales as they are close to each other at the tips and spread apart in the middle. This angle is achieved simply by tracing the gunwales on the deck beam. Flip the deck beam over and around and the line drawn on the bottom is now on top. The gunwales do not sit parallel to each other but instead spread apart such that the top of the gunwale is further apart than the bottom of the gunwale. I use a tool such as this to find the angle and trace it onto the deck beam. After that, its just a matter of making an accurate cut to make the deck beam fit the gunwales. Lots of words to describe this and lots of detailed work to make it fit perfectly.
To make the deck beams stay put, they get lashed and pegged. Pegging is strait forward. To lash it, I have figured out the most secure and tightest way is to drill two holes in the gunwale and saw two groves in the deck beams. Wrap sinew around the deck beam and gunwale and then pinch the sinew tight. The resulting lashing resembles and "H".
First Blood: In all my woodworking projects, bleeding seems to be a requirement before they get finished. While installing the thwart, I finally drew first blood. My pull saw is a very sharp saw and very good at making detailed cuts. When making detailed cuts, my hands are often a little too close the business side of the blade and cutting myself is quite common. I cut the tip of my finger and bled a small amount. Just enough to leave a few blood spots on the thwart. Now that I can check "bleeding" off the check list I hope I do not have to check "bleed again" off the check list.
Steam Bending: While this post is way too wordy, I might as well mention the next step of steam bending wood. When done correctly, its a miracle in woodworking science. When done incorrectly, its the most frustrating thing on the earth. The basic idea is that when heat is applied to wood, the chemical bonds that hold wood fibers together loosen up just enough to allow them stretch. Upon cooling, the bonds reform in their new positions and the wood is strong again. Steam is the most common way to apply heat to the wood. Certain woods bend better than others. Oak and ash are probably the best. My steam box is a PVC pipe and my steam source is a wallpaper steamer. While the wallpaper steamer is new, the PVC pipe is seeing its second action. Hopefully the revamped steam box will give me good results and I will create ribs, not firewood.
This post is definitely way too wordy but fits my day quite well... Way more complicated than I predicted.

Friday, December 11, 2009

update on the Lassie

So I've been a bad blogger. I've let many days of work pass without an update. I guess between a choice of working on building a canoe or writing about working on a canoe, the choice is obvious. I'm assuming people will be reading this and might be interested in building their own. A lot of the techniques I am using I have learned from building a few SOF boats already. If you are interested in building your own boat, a website or two and a few books are definitely worth looking into. Most skin on frame boats are made as Greenland kayaks and therefore most the directions are for building a Greenland yak. They are an excellent design and fairly easy to build. I have built two of them and like them both. The same techniques can build just about any boat, however.
http://www.instructables.com/id/Build-a-Greenland-Kayak/ Its free and written by a very knowledgeable builder.
http://www.qajaqusa.org/Equipment/kayaks.html qajaqusa's website if very informative and the books listed here are the complete listing. I used Morris's and
Cunningham's books. Unfortunately Morris's book is out of print. Star's book apparently uses similar techniques to what I'm using (by setting up forms to shape the ribs).
http://yostwerks.com/ Tom Yost does something very different but very functional. I have built a ribbed boat and a Yost boat, so I can recommend both techniques for building. The biggest problem with Tom's building technique is you need Tom (or someone else) to make the patterns first. For this reason, the Wee Lassie had to be ribbed.
So on to the building updates...

Day 4
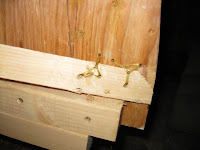
Short day involving lashing the gunwales to the stems and the keel to the stems. I love using artificial sinew (waxed nylon). It combines my love of sewing with my love of wood working.
Day5
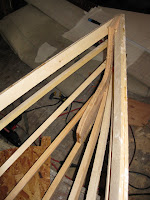
Very productive day. My goal was to set the stringers (stringers are longitudinal strips of wood to give the boat its shape, the keel is the middle one). I started on form 4 because its the widest one. I basically eyeballed where the stringers should be and marked them. I transferred the marks to the other side and drilled holes into the form. I figured I could adjust the placement of the stringers if need be, but found that it was not necessary.
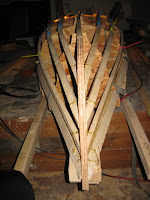
Cable ties secured the stingers. I then proceeded to one end and secured the tips of the stringers to the stems with cable ties and did the same thing to the other end. That was the basic extent of placing the stringers. I really thought it would be more complicated than that, but it wasn't. I continued down the boat until all the stringer were cable tied to all the forms. Up next was shaping the stringers to fit the stems (much like the step of shaping the gunwales to the stems). After shaping the stringers, I lashed them to the stems. While it only took one paragraph to describe that, it took most of my day off to do it. It definitely looks like a boat now.
Day 6
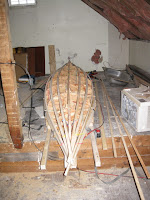
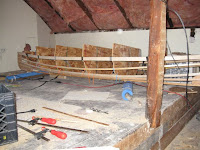
Day 6 was supposed to simply be taking the boat off the strong back, but I could not stop at that. I had to do more. So I started off with unscrewing the stems and forms from the strong back (tip, screws with the star head kick ass). I lifted the boat up and off the strong back and then rolled it over. In the back of my head I heard a yell of "FREEDOM" as the boat rested upright for the first time. In no time flat the strong back got turned back into a pile of lumber to be used for deck beams and chicken roosts (long story).
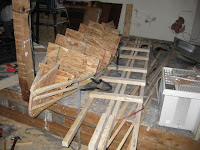
This was supposed to be the end of the day, but I started looking at cutting the stems away from their support and couldn't resist myself. It turned into the hardest two inches of the entire boat. As described in Day 3, I left the stems attached to the plywood it was cut from. In the past, my stems ended up crooked. To prevent this, the Lassie was built using a strong back and the stems were firmly attached to the strong back. Now I just need to finish cutting the stems out. Unfortunately a pair of stringers blocked the final two inches from being cut. My solution was to remove the blade from my jig saw and attach it to a clamp turning it into a hideous but very small saw.
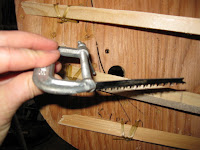
Needless to say, it took a while to cut the stern end free. The other couple of inches needing to be cut off could be reached with my pull saw and came off easier. I finished the stem by cutting the top flush with the gunwales. For the bow, I decided to use my 1/4 inch drill bit and just drill the be-jesus out of the two inches. While not pretty, it did work. My Dremel tool will finish the stems off and make them look pretty.
Although I say this at the end of every day, it really is looking like a boat now.
It looks like I could just jump into bending the ribs, but I do need to install deck beams first.

Friday, December 4, 2009

Day 3, lots of glue

The goal of day three was to attach the keel to the stems and shape the gunwales onto the stems. It must be pointed out, that will all my builds, this last step is my least favorate. In fact, I hate it. Unlike yesterday, in which I had a day off, today would have to be a partial day as I work second shift and have my mornings to work on the boat. I got to work pegging the keel in place. The keel it attached by placing two or three pegs in different directions. The force off all the angles working against each other holds them tightly in place. Through trail and error, I also lash them in place. I'm using 1/4 inch dowels and I glue them in place. Quickly done. Up next, my least favorite job.
I am trying something new this time and placing a strip of wood (the tip of a gunwale) on the stems and using that as I guide to cut off gunwale. I had to do this a couple of times to remove enough wood. In the past, I used the saw itself and slowly rubbed off little bit, by little bit until it was angled correctly. Of course in all my builds, they rarely angled nicely the first try. I'm also using a nice sturdy strong back to hold everything in place, so I was hopeful. To my surprise, it worked beautifully and it was done fairly quickly. This would be a good time to point out, how I made my stems. The stems are cut out of a larger peice of plywood. I left it attached to the plywood however and cut out about 75 percent of the inside cut. When everything is firmy attached to everything else I will cut our the rest. Only time will tell how easily it will be to finnish the cutting. It definitely worked to keep the stems strait and true.
With my daily goal done, I checked my clock. I still had 45 minutes left. With the next step being glueing the gunwales together, I started to get the ready. Most canoes use and inwale and and outwale with the ribs sandwiched between On the other side of the skin is usually a rub strip too. I decided to glue the inwale and outwale together to simply make a gunwale. My reasoning to use two peices instead of one to make the gunwale was to hopefully make them hold the curve better, the basic idea of laminating. My reasoning of not using the traditional order was because it seemed way too over complicated. Only time will tell if my decision was a good one. The tricky part would be to take the outwale off, while leaving the inwale attached and then to glue it back on in the exact same placement. This really wasn't all that complicated (but it was tedious) and it was done in all due time. With everything strapped back together, I decided to peg the tips the the stems. Once pegged it will get reinforced with lashing (literally hand sewn together). With my artificial sinew and needle in the house, the day was done. Another day of more progress than expected.


Day 2, mistakes and progress

So day two was supposed to be just setting up the strong back and putting the keel on. It started off with a mistake and an epiphany of sorts (not a major epiphany, though). I had cut out the first and last forms wrong. I then thought to myself, the success of this project will not be avoiding mistakes all together, it will be how I work with the mistakes I'm bound to make.
So with all the mind numbing, life changing discoveries over, I could get on with the build. Stems on, forms up and it kinda sorta started looking like a canoe. The afternoon quickly turned dark and my two window work shop started getting dark. I pulled out the camping lantern and paused to enjoy the moment. I could hear our brook/creek/ditch in the background. This canoe was going to be built two winters ago, but the wife finally came out of her grad school induced haze to stop me. She told me we would have to wait till we bought a house until this boat could be built. Of course I would not forget such an agreement and I have been waiting ever since. We have owned the house for about 5 months now and this canoe has a sense of pride with it. It means we finally are making it in this world. It was very peaceful. Back to work, the keel went in place and I had to keep going. So I pulled out the milled strips that the gunwales would become and started putting them in place. After a lot of strapping they were in place and it was looking slightly more boat like. The day ended with more progress than I expected.

Wednesday, December 2, 2009

wee lassie

So my blog is going to turn into a builders log for a little bit. I'm going to build another boat. I have already built about 5 boats, two were fantastic failures, one I gave away and two I still have and use. So why another? I have been on the quest for the perfect small boat and believe I found it in an 11.5 ft canoe called the Wee Lassie. The original was built by J. Henry Rushton in upstate New York in the late 1800's. The version I'll be building is based off of the book "Featherweight Boatbuilding" by Mac McCarthy. Although the original is a piece of American history, these days any small canoe is called a Wee Lassie, regardless of how closely it follows the original lines. Although Featherweight Boatbuilding describes how to build a strip built boat, but I'm going to make it a skin-on-frame since its the style of boat I have built in the past and the style I have the most experience in. I plan on building my Wee Lassie in our two story shed this winter. I will have to wait until the spring to finish it as the skin needs to be painted in warmer weather. I plan on using mostly pine that was cut from 2x4's and 1 inch stock. The stems will be made from plywood. My gunwales will be two strips of 1/3 inch by 1.5 inch strips that will be placed on the forms and then glued together. The oak ribs are 1/4 inch by 3/4 and were cut from 1/4 inch strips of red oak from Home Depot. The gunwales and stringers will be molded to a forms giving the boat its shape. After the shape of the boat is given on the forms, steam bent oak strips will be placed inside the boat to give it structural rigidity. Once everything gets lashed together, the forms will be removed leaving a frame ready for skinning.

Part one: To build my boat I will be cutting out cross section forms and placing them on a "strong back" to give the boat shape. To do this, I followed the patterns from the book and placed them on paper. Once on paper they are modified from the original patterns for strip building to the dimensions needed for skin on frame. The original pattern are made 1/4 inch smaller than the finished product to account for 1/4 inch thick strips of wood. A skin on frame on the other hand use 3/4 inch stringers. Once modified, the shape is transferred to plywood (in this case OSB). Today's job was to transfer the patterns to the stems and cutting everything out (the forms were transferred previously). Up next it to place the forms onto the strong backs. I'll include a picture or two as well.